# proxmox
# CPU Pinning
#### How to do CPU pinning (work in progress)
Create a file under `/etc/pve/qemu-server/$vmid.cpuset` for the VM which you want to set the CPU pinning for.
Examples:
```bash
0-1
```
```bash
0-1,6-7
```
Depending on your [CPU topology](https://wiki.archlinux.org/title/PCI_passthrough_via_OVMF#CPU_topology) assign the proper cores to your VM. You can find out the topology by running `lscpu -e`
Next create a file called `taskset-hook.sh` and save it under `/var/lib/vz/snippets/`, create the snippets folder if it's not there already and make the script executable.
Content:
```shell
#!/bin/bash
vmid="$1"
phase="$2"
if [[ "$phase" == "post-start" ]]; then
main_pid="$(< /run/qemu-server/$vmid.pid)"
#cpuset="0-11"
cpuset="$(< /etc/pve/qemu-server/$vmid.cpuset)"
taskset --cpu-list --all-tasks --pid "$cpuset" "$main_pid"
fi
```
```bash
mkdir /var/lib/vz/snippets
cp taskset-hook.sh /var/lib/vz/snippets
chmod +x /var/lib/vz/snippets/taskset-hook.sh
```
Finally set the script to the VM:
`qm set VMID --hookscript local:snippets/taskset-hook.sh`
If for some reason the script is not working for you or you just want it to be removed, simply open `/etc/pve/qemu-server/VMID.conf` and remove the script.
Sources:
- [https://forum.proxmox.com/threads/cpu-pinning.67805/post-304715](https://forum.proxmox.com/threads/cpu-pinning.67805/post-304715)
- [https://wiki.archlinux.org/index.php/PCI\_passthrough\_via\_OVMF#Performance\_tuning](https://wiki.archlinux.org/index.php/PCI_passthrough_via_OVMF#Performance_tuning)
# Proxmox GPU Passthrough
#### GPU Passthrough
This configuration worked for me, you might need to change things around
Keep in mind I have an AMD CPU and Nvidia GPU, if you have other config, you might have to use different commands
After upgrading Proxmox to 7.2, passthrough wasn't working. To make it work again try resetting your graphics card: [Resetting GPU](https://wiki.tozo.info/books/server/page/resetting-gpu "Resetting GPU")
OR keep reading, the GRUB parameters have to be changed to make it work again with the latest kernel!
##### Configuring BIOS
Before doing anything make sure virtualization and IOMMU is enabled in your BIOS, you can't do anything bofore that.
If your motherboard doesn't support IOMMU, then you can't pass through PCI(e) devices to your VMs.
##### Update the Host configuration
Login to the host and open `/etc/default/grub`. Find the line `GRUB_CMDLINE_LINUX_DEFAULT` and change it from:
```bash
GRUB_CMDLINE_LINUX_DEFAULT="quiet"
```
to
```bash
GRUB_CMDLINE_LINUX_DEFAULT="quiet iommu=pt nofb nomodeset initcall_blacklist=nvidiafb_init"
```
Run `update-grub` to append the grub's content to all linux entries in `/boot/grub/grub.cfg`.
Next go to `/etc/modules-load.d`, create a file there called `vfio.conf` and add the followings:
```bash
vfio
vfio_iommu_type1
vfio_pci
```
After these changes run the below to refresh the `initramfs`, then restart your server:
`update-initramfs -u -k all`
Once it's restarted, run the below commands to check if IOMMU was successfully enabled:
```bash
dmesg | grep -e DMAR -e IOMMU -e AMD-Vi
```
It should display that `IOMMU, Directed I/O or Interrupt Remapping is enabled` or something similar, it could be different on your hardware.
Also check that the devices are in different IOMMU groups:
```bash
find /sys/kernel/iommu_groups/ -type l
```
##### Device passthrough setup
First find the device Ids that you want to passthrough.
Run
```bash
lspci -nn
```
which will display all the devices and their Ids in the host. Find yours and write it down.
It looks something like `[1245:4f5a]`, don't forget the copy the audio device's Id + USB Ids as well
Since we want to use a GPU in our VM, we have to passthrough all the devices.
You also have to blacklist your GPU so the host won't utilize it. This is how my `/etc/modprobe.d/pve-blacklist.conf` looks like:
```bash
# This file contains a list of modules which are not supported by Proxmox VE
# nidiafb see bugreport https://bugzilla.proxmox.com/show_bug.cgi?id=701
blacklist nvidia
blacklist nouveau
blacklist nvidiafb
blacklist i2c_nvidia_gpu
blacklist nova_core
```
Then in your `/etc/modprobe.d/vfio.conf` insert:
```bash
options vfio-pci ids=10de:2187,10de:1aeb,10de:1aec,10de:1aed
```
Here the Ids are the ones which you copied previously.
Also create `/etc/modprobe.d/kvm.conf` with the below content:
```bash
options kvm ignore_msrs=1
```
This will allow to use Nvidia cards on Windows when you set the CPU to host.
Create `/etc/modprobe.d/vfio-priority.conf` with this content:
```
softdep nouveau pre: vfio-pci
softdep nvidia pre: vfio-pci
softdep nvidiafb pre: vfio-pci
softdep nova_core pre: vfio-pci
softdep xhci_pci pre: vfio-pci
```
This is so that the drivers are loaded in the proper order.
Apply these changes: `update-initramfs -u -k all` then restart the host.
At this point your host should be ready.
##### Creating VM
[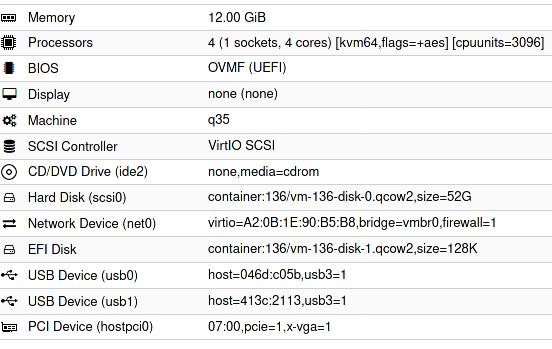](https://wiki.tozo.info/uploads/images/gallery/2022-04/cSocxRzpK1U0hQr0-image-1651343431383.png)
Configuration in a text format:
```
bios: ovmf
bootdisk: scsi0
cores: 4
cpu: kvm64,flags=+aes
cpuunits: 3096
efidisk0: container:136/vm-136-disk-1.qcow2,size=128K
hostpci0: 07:00,pcie=1,x-vga=1
ide2: none,media=cdrom
machine: q35
memory: 12288
name: ubuntu8
net0: virtio=A2:0B:1E:90:B5:B8,bridge=vmbr0,firewall=1
numa: 0
ostype: l26
scsi0: container:136/vm-136-disk-0.qcow2,size=52G
scsihw: virtio-scsi-pci
smbios1: uuid=b925668d-9785-4941-ab36-4151164248c7
sockets: 1
usb0: host=046d:c05b,usb3=1
usb1: host=413c:2113,usb3=1
vga: none
vmgenid: 9aae2c4f-30ff-4a2b-ac56-805e49c670d5
```
- The `07:00` is my GPU set to `hostpci0`
- vga has to be set to null
- cpu can be kvm64, it doesn't have to be host
- I set cpuunits to higher than default so proxmox will prioritize this VM
Sources:
- [https://pve.proxmox.com/wiki/Pci\_passthrough](https://pve.proxmox.com/wiki/Pci_passthrough)
- [https://pve.proxmox.com/wiki/PCI(e)\_Passthrough](https://pve.proxmox.com/wiki/PCI(e)_Passthrough)
- [https://old.reddit.com/r/homelab/comments/b5xpua/the\_ultimate\_beginners\_guide\_to\_gpu\_passthrough/](https://old.reddit.com/r/homelab/comments/b5xpua/the_ultimate_beginners_guide_to_gpu_passthrough/)
- [https://wiki.archlinux.org/index.php/PCI\_passthrough\_via\_OVMF](https://wiki.archlinux.org/index.php/PCI_passthrough_via_OVMF)
- [https://www.kernel.org/doc/html/v5.15/admin-guide/kernel-parameters.html](https://www.kernel.org/doc/html/v5.15/admin-guide/kernel-parameters.html)
- [https://forum.proxmox.com/threads/problem-with-gpu-passthrough.55918/post-478351](https://forum.proxmox.com/threads/problem-with-gpu-passthrough.55918/post-478351)
# Useful Proxmox commands
#### Useful Proxmox commands/scripts
[`pct`](https://pve.proxmox.com/pve-docs/pct.1.html) `cpusets`
Prints the assigned CPU sets to the LXC containers.
---
`systemctl status .scope`
Displays the process of a specific VM
---
`lscpu -e`
Prints CPU topology
[More details](https://wiki.archlinux.org/index.php/PCI_passthrough_via_OVMF#Performance_tuning)
---
`qm showcmd `
Displays the command that Proxmox generates for a given VM
---
`proxmox-boot-tool`
Can select/list/pin kernels with PVE 7.2
---
If a backup fails with something like:
` tar: ./var/lib/dpkg/info/libdebconfclient0\:amd64.shlibs: Cannot stat: Bad message`
Then probably there is an issue with the underlying filesystem of that specific vm/container.
To fix it ssh into the server, find the container and run:
`fsck /dev/mapper/sdd--1TB-vm--100--disk--0`
# ZFS pool
#### ZFS
##### Pool couldn't be mounted
If after a system update the ZFS pool can't be mounted, the issue could be the corrupted ZFS cache.
To fix that run the following commands:
```bash
# First create a backup
mv /etc/zfs/zpool.cache /etc/zfs/zpool.cache.bkp
# Enable relevant services if they aren't already
systemctl enable zfs-import-scan.service
systemctl enable zfs-import.target
reboot now
# This is optional, you could the pool if you want,
# but after the restart at the end it should be mounted automatically
zfs mount POOLNAME
# Execute this line for every ZFS pool
zpool set cachefile=/etc/zfs/zpool.cache POOLNAME
update-initramfs -u -k all
reboot now
```
Sources:
- [proxmox not mounting zfs correctly at boot](https://forum.proxmox.com/threads/proxmox-not-mounting-zfs-correctly-at-boot.65724/post-296122)
- [Update broke LXC](https://forum.proxmox.com/threads/update-broke-lxc.59776/post-277303)
# Resetting GPU
Keep in mind I haven't yet tested this with AMD card
Hookscript example:
```shell
#!/bin/bash
if [ $2 == "pre-start" ]
then
echo "gpu-hookscript: Resetting GPU for Vitual Machine $1"
echo 1 > /sys/bus/pci/devices/0000\:07\:00.0/remove
echo 1 > /sys/bus/pci/devices/0000\:07\:00.1/remove
echo 1 > /sys/bus/pci/devices/0000\:07\:00.2/remove
echo 1 > /sys/bus/pci/devices/0000\:07\:00.3/remove
echo 1 > /sys/bus/pci/rescan
fi
```
As you can see I remove multiple devices, they are basically the audio and USB devices found on the GPU and I just wanted to make sure they are all reset, but I am not 100% confident they are needed.
Note: you have to change the device id to match yours
Then deploy it:
```shell
#create snippets folder
mkdir /var/lib/vz/snippets
#create script with content above
nano /var/lib/vz/snippets/gpu-hookscript.sh
#make it executable
chmod +x /var/lib/vz/snippets/gpu-hookscript.sh
#apply script to VM
qm set 100 --hookscript local:snippets/gpu-hookscript.sh
```
Source:
- [https://forum.proxmox.com/threads/gpu-passthrough-issues-after-upgrade-to-7-2.109051/post-469855](https://forum.proxmox.com/threads/gpu-passthrough-issues-after-upgrade-to-7-2.109051/post-469855)
# Setting up Home Assistant
1. Create a normal Linux VM for Home Assistant, but there are some exceptions to the normal procedure:
- Don't create a disk, not needed since we are going to use the one downloaded from Home Assistant's website
- Make sure the BIOS id `OVMF (UEFI)`
- Also un-tick "Pre-Enroll keys"
2. Download the latest qcow2 file from the [official Home Assistant site](https://www.home-assistant.io/installation/linux)
3. Extract it and upload to the Proxmox server
4. Import it to the VM you just created:
- `qm importdisk haos_ova-X-Y.qcow2 --format qcow2`
- fill out the VM number to match yours
- also use the correct filename for Home Assistant
- the storage pool is where you want the qcow2 file to be located (it can be the same where your UEFI disk is)
5. Go back to the VM Hardware settings page and attach the imported disk by clicking on the disk, then Edit -> Add
6. Under `Options -> Boot order` on the VM, enable and then move this disk to the first place so it will boot from that
Source:
- [https://www.juanmtech.com/install-proxmox-and-virtualize-home-assistant/](https://www.juanmtech.com/install-proxmox-and-virtualize-home-assistant/)
- [https://forum.proxmox.com/threads/failing-to-boot-home-assistant-qcow2-image-disk-uefi-access-denied.99892/](https://forum.proxmox.com/threads/failing-to-boot-home-assistant-qcow2-image-disk-uefi-access-denied.99892/)
# Setting up email sending
1. create a backup of your postfix config: `cp /etc/postfix/main.cf /etc/postfix/main_bak.cf`
2. open `/etc/postfix/main.cf`
3. add the following rows (make sure none of the rows are duplicated) ```
#mydestination = $myhostname, server.local, localhost.local, , localhost # you can comment this out
relayhost = [smtp.mail.com]:465 # replace this domain with your mail server
smtp_use_tls = yes
smtp_sasl_auth_enable = yes
smtp_sasl_security_options = noanonymous
smtp_sasl_password_maps = hash:/etc/postfix/sasl_passwd
smtp_tls_CAfile = /etc/ssl/certs/ca-certificates.crt
smtp_tls_wrappermode = yes
smtp_tls_security_level = encrypt
# If your mail provider doesn't support ipv6, add/change this line
inet_protocols = ipv4
```
4. create this file: `/etc/postfix/sasl_passwd` with the following content: ```
[smtp.mail.com]:465 test@mail.com:PASSWD
```
5. make it only readable by your user: `chmod 600 /etc/postfix/sasl_passwd`
6. then: `postmap /etc/postfix/sasl_passwd`
7. install for passwd support: `apt install libsasl2-modules`
8. restart postfix: `systemctl restart postfix.service`
9. you can test it multiple ways: ```
echo "Test mail from postfix" | mail -s "Test Postfix" test@test.com
OR
echo "test" | /usr/bin/pvemailforward
```
10. logs can be found here:
- `/var/log/mail.warn`
- `/var/log/mail.info`
##### Common Issue:
If you can't send emails, because the domain in the FROM address is pointing to your server and the configured mail server rejects the mails with the following error:
```
Sender address rejected: Domain not found (in reply to RCPT TO command))
```
Then go to `Datacenter -> Options -> Email from address` and change it from `root@$hostname` to something that your mail server will accept.
Sources:
- [https://forum.proxmox.com/threads/get-postfix-to-send-notifications-email-externally.59940/](https://forum.proxmox.com/threads/get-postfix-to-send-notifications-email-externally.59940/)
- [https://www.digimoot.com/proxmox-setup-email-service/](https://www.digimoot.com/proxmox-setup-email-service/)